Sunday, March 13, 2011
Sweet peas...
Spring is on its way to California. A few weeks ago, I planted seven packages of sweet peas in my garden. They all sprouted this week, and I can't wait for this:
(Images The Bride's Cafe, Jodi Miller Photography)
Thursday, February 10, 2011
Glassybaby...
Have you heard about Glassybaby? My mom sent me one the other day (thanks mom!) that looks like this:

I thought they were kind of expensive ($40) for a votive holder, but it is so pretty with a candle burning in it-- warm and colorful. I really love it!
Tuesday, February 8, 2011
Valentines...
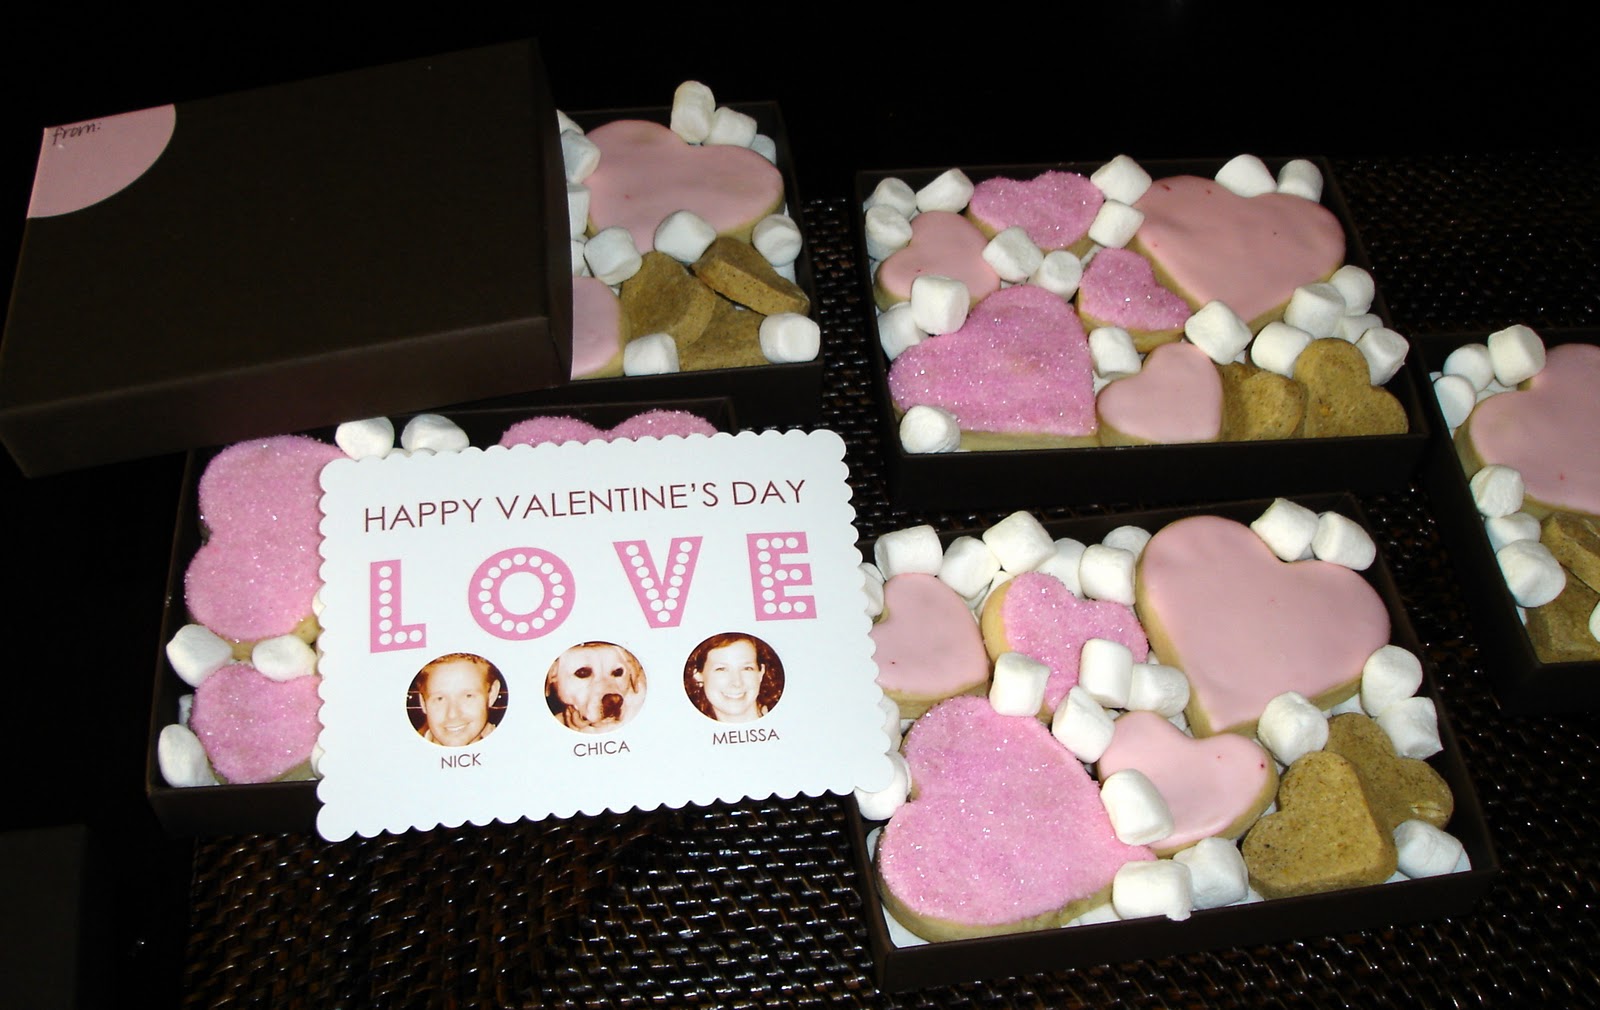
We got our dog Chica last year, two weekends before Valentines Day. Because of the timing, I thought it would be cute to send valentines from the "3" of us. Our families all have dogs so Chica has some canine cousins. I bought Papersource boxes, made valentines, and packaged them in the boxes with cutout pink heart cookies for the humans and heart shaped bones for the dogs.
I used mini-marshmallows for padding, which the dogs also loved. A fun debut for Chica!
Friday, February 4, 2011
Winter home improvement...
Around this time last year I started working on a big garage improvement project. The homes where we live are relatively small and extremely expensive, so really using the garage makes sense (it is California, so a lot of people don't park in their garages). Ours, however, was not very pleasant:
The idea was to keep it as a functioning garage so we could park in it when we want to, but to make it a nice workroom that didn't feel like such a dungeon the rest of the time. We decided to paint it white, epoxy the floor, and install some storage cabinets. It took 3 coats of primer and 2 coats of semigloss paint to get all that wood covered, but it made a huge difference:
Then we applied Rustoleum Epoxy to the floor. It was only $120 and was another huge improvement from the bare concrete. You have to prep the floor properly, but it is really pretty easy and you can finish it in a weekend. This is the floor before and after:
The white cabinets are actually the most basic kitchen cabinets from Ikea. They were about the same price as the garage cabinets you can get at Home Depot or Lowes but much better quality. I got a big craft table there too. We also hung some white pegboard for tools and outdoor equipment:
This is the total before and after. We love it and use it all the time.
The idea was to keep it as a functioning garage so we could park in it when we want to, but to make it a nice workroom that didn't feel like such a dungeon the rest of the time. We decided to paint it white, epoxy the floor, and install some storage cabinets. It took 3 coats of primer and 2 coats of semigloss paint to get all that wood covered, but it made a huge difference:
Then we applied Rustoleum Epoxy to the floor. It was only $120 and was another huge improvement from the bare concrete. You have to prep the floor properly, but it is really pretty easy and you can finish it in a weekend. This is the floor before and after:
The white cabinets are actually the most basic kitchen cabinets from Ikea. They were about the same price as the garage cabinets you can get at Home Depot or Lowes but much better quality. I got a big craft table there too. We also hung some white pegboard for tools and outdoor equipment:
This is the total before and after. We love it and use it all the time.
Wednesday, February 2, 2011
Baby Bee gift...
All of our friends are starting to have babies, and it seems that most of them get so overwhelmed with hand-me-down baby clothes and stuff that they barely need anything by the time the shower rolls around. I read somewhere about blabla dolls and thought one would be a perfect present since that is not the type of thing one would usually receive as a hand-me-down. So I ordered mini Clochette the fairy. She is so soft and squishy... it seems like the perfect first doll for a baby girl. You can also wash them, so it seemed great for a really little kid.
I also made a set of baby bee onsies with the bee logo to go with he. I used fabric paint for the letters and the iron-on transfers left over from my Thanksgiving project for the bee logos. A set of 3 onsies was only $6 so this was a very affordable and super cute project. This is the front:
And this is the back:
Tuesday, February 1, 2011
First harvest...
Well, it is actually just one orange, so it is not exactly a harvest. But it is the first orange I've ever grown so it's kind of exciting. My sister gave us a blood orange tree for Christmas when we moved into our house two years ago. Nice gift, then she said "it is supposed to bear fruit in 8 to 10 years." Hmmm...we're patient, but that seemed like a long time. However, two short years later, look what we have:
It is tiny, but juicy and delicious! Thanks Meg-- glad we didn't have to wait 8 years to tell you!
Monday, January 31, 2011
More Baby Bee details...
Baby Bee's mom assured me that she didn't think I went overboard with bees, but I was worried for a while. Here are a few more Baby Bee shower details...
The Baby Bee sign. I have always wanted to make one of these, and I loved the way this one turned out. The bee wings are glittered.
Bee logo name tags. It took me a while to come up with an idea for cute name tags. I printed out the bee logo and wrote names in calligraphy, then tied a tiny bow with the ribbon and stuck them together with a glue dot. They pinned on with a corsage pin. I made corsages with pink spray roses for Mom and Grandma-to-be.
A sheet with the bee logo for recording gifts that I mounted on white cardboard...
Calligraphy signs for the Baby B wishes jar and the "guess how many bees" game...
And of course lots of flowers. I used yellow roses, orange gerbera daisies, pink spray roses, orange and pink snapdragons and tulips, and some yellow filler that was perfect for the arrangements.
The Baby Bee sign. I have always wanted to make one of these, and I loved the way this one turned out. The bee wings are glittered.
Bee logo name tags. It took me a while to come up with an idea for cute name tags. I printed out the bee logo and wrote names in calligraphy, then tied a tiny bow with the ribbon and stuck them together with a glue dot. They pinned on with a corsage pin. I made corsages with pink spray roses for Mom and Grandma-to-be.
A sheet with the bee logo for recording gifts that I mounted on white cardboard...
Calligraphy signs for the Baby B wishes jar and the "guess how many bees" game...
And of course lots of flowers. I used yellow roses, orange gerbera daisies, pink spray roses, orange and pink snapdragons and tulips, and some yellow filler that was perfect for the arrangements.
Saturday, January 29, 2011
Baby Bee food...
As I mentioned, in spite of the dog's cookie rampage the Baby Bee shower turned out perfect. Here are more details on what we served...
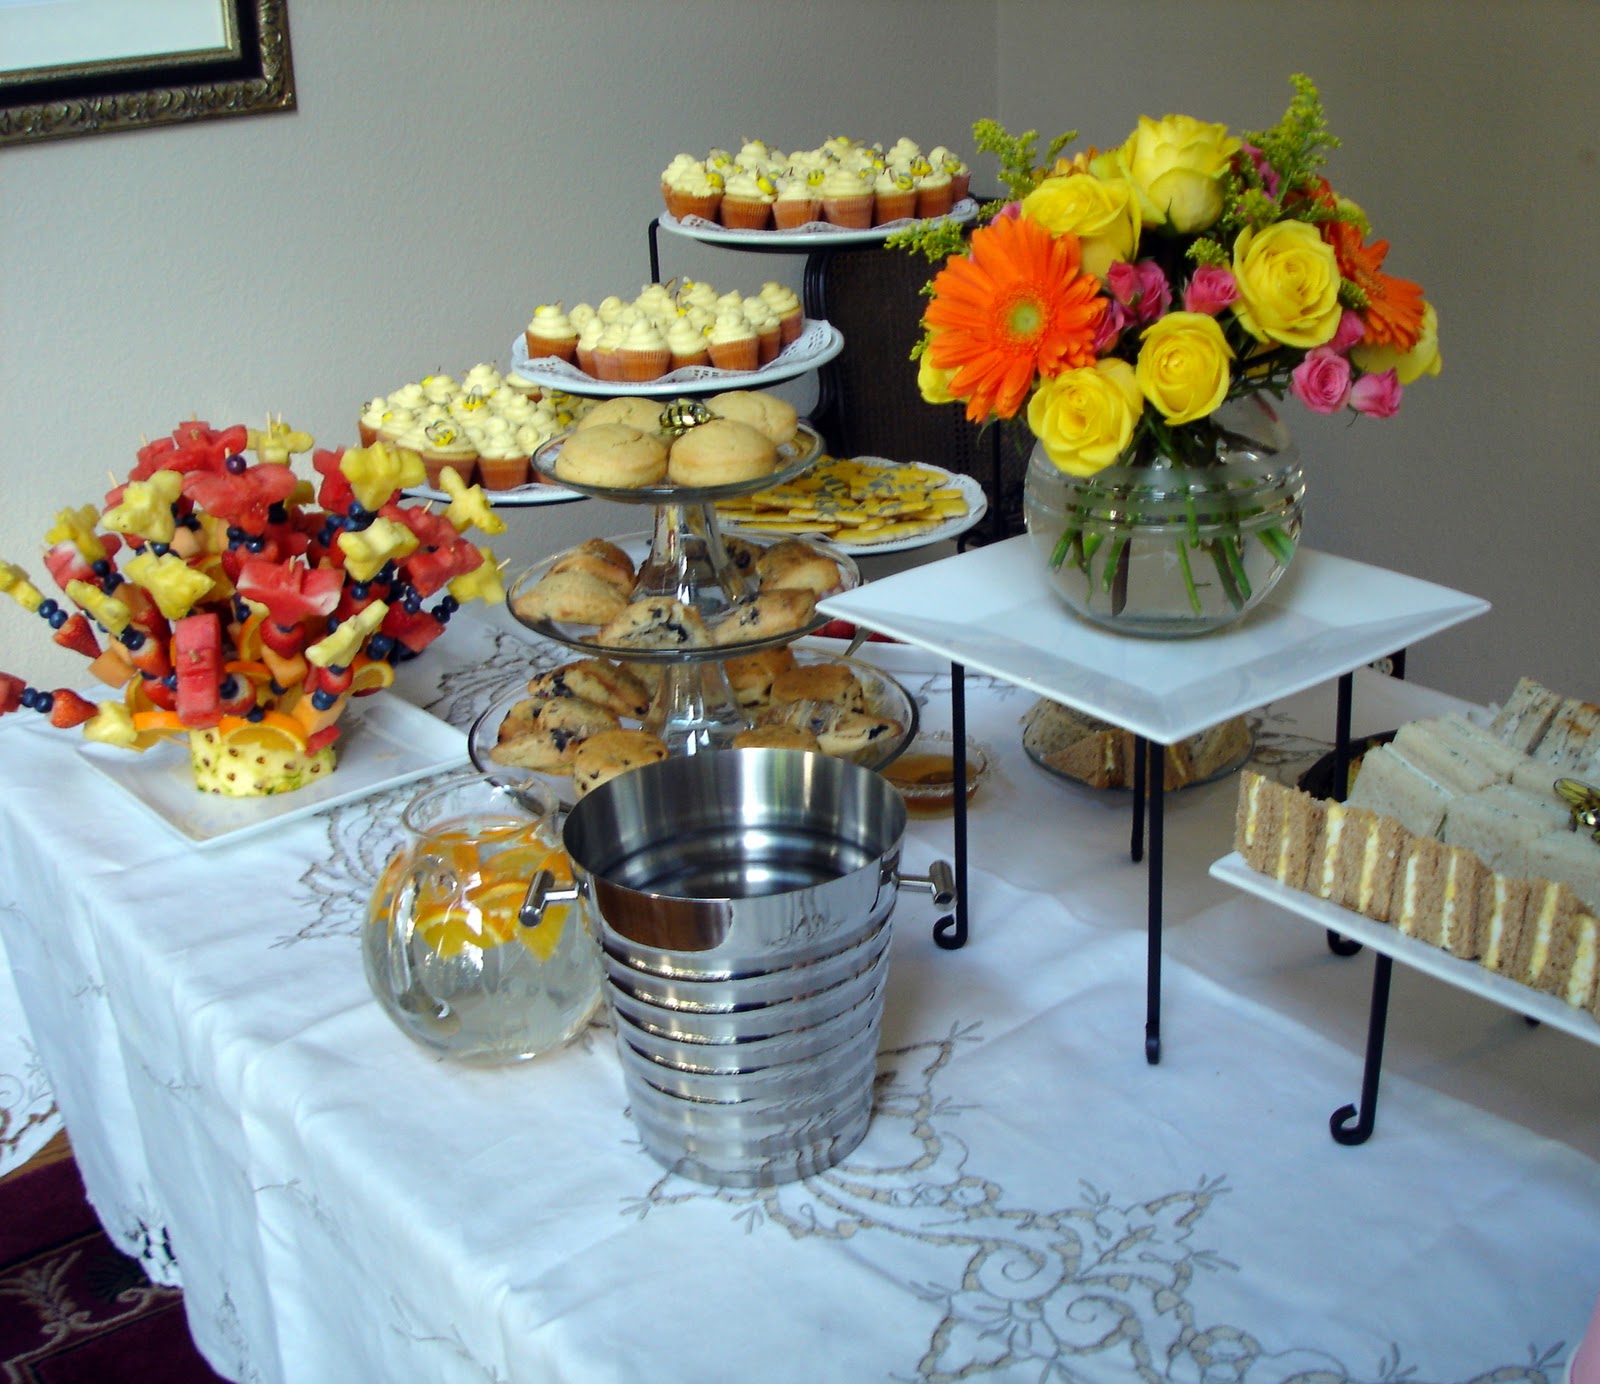
The table-- we served tea sandwiches, mini quiches, deviled eggs fruit skewers, scones, strawberries filled with cream cheese, bee cookies and mini beehive cupcakes.
The beehive cupcakes were a big hit. I just piped buttercream onto the top of them with a wide tip. Then I took yellow M&Ms and piped frosting stripes onto them, stuck them into the frosting and added a couple of almond slivers for wings.
We also had a mini candy bar with yellow, pink, and orange candy. I made little calligraphy signs with the bee logo.
And finally, more bee cookies.
The table-- we served tea sandwiches, mini quiches, deviled eggs fruit skewers, scones, strawberries filled with cream cheese, bee cookies and mini beehive cupcakes.
The beehive cupcakes were a big hit. I just piped buttercream onto the top of them with a wide tip. Then I took yellow M&Ms and piped frosting stripes onto them, stuck them into the frosting and added a couple of almond slivers for wings.
We also had a mini candy bar with yellow, pink, and orange candy. I made little calligraphy signs with the bee logo.
And finally, more bee cookies.
Tuesday, January 25, 2011
Dog versus bee...
I am a big fan of edible favors. Mostly because you know someone will almost always eat them, whereas other favors tend to get thrown away. (Yes, sorry friends, I probably won't keep that wedding mug you hand out at your wedding. Nothing against you, I just like my mugs to match...). So my original plan for the Baby Bee favors was cut-out beehive and bee cookies. Actually, it was not just a plan-- I fully implemented it and I had 20 that looked just like this:
I have large craft table in my garage and I have a habit of piling all of my projects on it, so when I finished packaging them, I put them neatly in a bag and set that bag on top of my table.
When I did that, however, I forgot that (1) we put the dog in the garage when we are gone and (2) the dog loves cookies. She is a really good dog and has never really chewed on anything but her dog toys, so it didn't even cross my mind that the bee cookies might drive her crazy. But they did... and she attacked:
And when I came home my garage looked like this:
The dog had eaten 15 beehives, who knows how many bees. She was on a major sugar high (kind of funny) but otherwise unharmed, and not sick in the least. She even licked up crumbs as I cleaned up, and she never licks crumbs.
After I cleaned up her mess, I had to think of a plan b for the favors. I had a lot of bees but not enough hives, so I repackaged them in smaller bags with smaller tags and just one bee cookie. Fortunately they still turned out cute:
But now you know what happens when Dog takes on Bee... if it is a cookie, the bee has no chance!
I have large craft table in my garage and I have a habit of piling all of my projects on it, so when I finished packaging them, I put them neatly in a bag and set that bag on top of my table.
When I did that, however, I forgot that (1) we put the dog in the garage when we are gone and (2) the dog loves cookies. She is a really good dog and has never really chewed on anything but her dog toys, so it didn't even cross my mind that the bee cookies might drive her crazy. But they did... and she attacked:
And when I came home my garage looked like this:
The dog had eaten 15 beehives, who knows how many bees. She was on a major sugar high (kind of funny) but otherwise unharmed, and not sick in the least. She even licked up crumbs as I cleaned up, and she never licks crumbs.
After I cleaned up her mess, I had to think of a plan b for the favors. I had a lot of bees but not enough hives, so I repackaged them in smaller bags with smaller tags and just one bee cookie. Fortunately they still turned out cute:
But now you know what happens when Dog takes on Bee... if it is a cookie, the bee has no chance!
Monday, January 24, 2011
Baby Bee Invitations...
Last week I gave a little preview of the Baby Bee shower that I hosted this weekend. One of my good friends has a last name that starts with the letter "B" and I have been calling the baby "Baby B" ever since I found out she was pregnant. They are probably going to give the baby a "B" first name too, so I thought a "Baby Bee" shower would be perfect.
When we heard Baby B was a girl, I decided a color palate of yellow, orange, pink and gray would be nice, and I found the perfect ribbon from May Arts. I designed the little bee in inkscape, and wrapped it all up with the ribbon and a "baby bee" tag in a Papersource petal enclosure.
The calligraphy is mine, scanned into Inkscape and colored gray to match the rest of the invitation. I mixed up some gray ink to address the invitations. This was the first time I had done a return address in calligraphy and I loved the way it turned out. I also got lucky at the post office-- they just happened to have the perfect extra-postage stamp for the square envelopes!
We also thought something like a guest book would be nice, so I made little notecards for people to sign with their wishes for Baby B. At the end of the shower, we wrapped them up and sent them home for mom and dad-to-be to read together.
Stay tuned for bee cookies, behive cupcakes, how to turn a yellow M&M into a bee, and what happens when a yellow lab takes on bees!
When we heard Baby B was a girl, I decided a color palate of yellow, orange, pink and gray would be nice, and I found the perfect ribbon from May Arts. I designed the little bee in inkscape, and wrapped it all up with the ribbon and a "baby bee" tag in a Papersource petal enclosure.
The calligraphy is mine, scanned into Inkscape and colored gray to match the rest of the invitation. I mixed up some gray ink to address the invitations. This was the first time I had done a return address in calligraphy and I loved the way it turned out. I also got lucky at the post office-- they just happened to have the perfect extra-postage stamp for the square envelopes!
We also thought something like a guest book would be nice, so I made little notecards for people to sign with their wishes for Baby B. At the end of the shower, we wrapped them up and sent them home for mom and dad-to-be to read together.
Stay tuned for bee cookies, behive cupcakes, how to turn a yellow M&M into a bee, and what happens when a yellow lab takes on bees!
Subscribe to:
Posts (Atom)